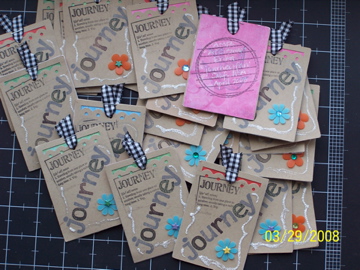
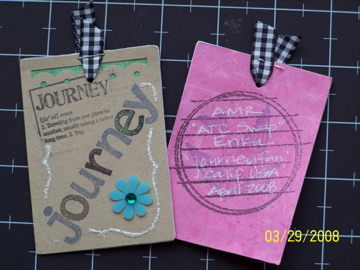
In my last POST, I told you about the ATC Swap I’m participating in as a member of the AMR MESSAGE BOARD. I promised to show you my first attempt at EVER making an ATC, so here goes…these are the ATC’s I created and will be mailing to Jingle tomorrow:
I’m showing the front and back sides, and also that I made four or five variations of color combos. On the front they say “Journey” and then there is a “journey” definition stamp. The reason this represents ME is that, on every message board I’m on, even my e-mail address, my handle is always “journeyfan.” It has a triple meaning, but the easy one is that I’m a HUGE fan of the 70s/80s band Journey, and have been since junior high. Anyway, my ATC’s probably don’t look like much, but they really were a lot of work for some reason! Here are the steps I used to make them:
1. Cut all the kraft cardstock and patterned paper into 2.5″ x 3.5″ “cards” and used the scraps of PP to cut the little slivers that show behind the scallop punchout (the color in there is different than whatever color is on the back of the card).
2. Used my awesome new FISKARS THREADING WATER PUNCH to cut a scallop within each card (as opposed to scalloping an entire edge).
3. With acrylic stamps and chalk ink, stamped the word “journey” on the kraft cards. First I did the j-u-n-y letters, spaced apart, in one color (steel blue). Then I did the o,r and e separately in different colors (dark grey, green and purple).
4. Used an acrylic stamp and black chalk ink for the “journey” definition. It was part of a larger stamp, so I masked it with, what else?, masking tape! Wow, my first ever masking! I impressed myself! (Note: I’m barely a decent scrapbooker, and I’m NOT a stamper by any means).
5. Used acrylic stamps and silver ink to stamp a bird, then a journaling circle with black ink on the patterned paper cards.
6. Added the plastic flowers and either a glitter star brad or a “bling” to the center of each flower.
7. Adhered the little PP strips to the back side of the scallop punchout.
8. Adhered both sided of the card together, trying a variety of adhesive methods until I found one that worked, LOL.
9. Used a sanding block to sand the edges of the cards and make them blend together better, and to give a lightly distressed look.
10. Cut the ribbon into 2 inch pieces, punched the middle hole with the Cropadile to make it larger, threaded the ribbon through and stapled it.
11. Used white or black pens to write on the back: AMR “ATC Swap”, Erika, ‘journeyfan,’ Calif. USA, April 2008
12. Laid all the ATC’s out across my desk and “Stickled” them, to the best of my ability (which, seeing them after they dried, was not much ability…).
Materials Used: Bazzill kraft cardstock, My Minds Eye ‘Everyday Tango’ patterned paper, Color Box Cat’s Eye chalk inks in Night Sky queue (that I got from AMR Store), Autumn Leaves acrylic stamps ‘Hand Drawn Alphabet by Katie Pertiet’ and journaling circle ($1 stamp set from Target), 7 Gypsies clear stamp set from QVC, American Crafts plastic flowers, Making Memories glitter star brads, MAMBI bling from Michaels, ‘Frosted Lace’ Stickles from AMR Store, and random black/white gingham ribbon.
Overall, I guess I’m happy with them. You know how it is, there are such talented ladies on the board, that I hope I don’t embarrass myself! But they were fun to do, I tried some things I wouldn’t normally do (like masking a stamp), and it got me to break out the myriad of acrylic stamps I’ve collected and not used enough. Do you think they’re okay for a swap?
Oh! And if you are going to enter ATC World anytime soon, I thought I’d show you these items I saw in the AMR STORE that seem to be very popular among the Message Board Girlz:

And ATC TAG PACK:

The best part is going to be seeing all the cards from the other girls when they come in the mail. I can’t wait! Thanks for reading about my “journey” into ATC’s (man, I’m so funny, I crack myself up!).

